
Intaglio Tetrapak Printmaking Experiments
- Feb 9, 2024
- 5 min read
Updated: Mar 9
Intaglio Tetrapak printmaking is an art making process I've been wanting to try for a while, but I never seemed to find the right moment - until now!

Many years ago (I won't tell you how many) I made some prints using the drypoint etching technique where a sharp tool is used to incise marks into a surface which then hold the ink for printing. I loved the results but back then I was using a metal plate and looking back, the process felt a little laborious, more permanent and costly.
Using waste tetrapak packaging as a 'plate' that performs in a similar way to more traditional surfaces makes the Intaglio printmaking process more easily accessible and lends itself greatly to experiments as the foundation material is free - if you use stocks, broths or UHT milk.
I do have a small etching press which makes the printing process more effective, due to the pressure that needs to be applied to ensure the paper is pressed into the inked surface sufficiently to take up the ink.
It would be difficult to achieve these results without a press of some kind. That said, the process of creating a simple plate to print from was quick and easy.
| What is Intaglio?
A design or drawing is cut, scratched, or etched into the printing surface of a 'plate', which can be copper, zinc, aluminum, magnesium, plastics, or coated paper (in this case Tetrapak).
The printing ink is then rubbed manually into the incisions or grooves, and the surface is wiped clean.
The ink forming the design is printed only from recessed areas of the plate, unlike lino for example which only prints from the raised areas of the plate.
Once pressure is applied to the plate and the paper by rolling it through a press, the paper is squeezed into the plate's ink-filled grooves with a uniform pressure which transfers the ink to the paper.
| The Process
I cut open a Tetrapak one litre stock carton and a 250ml cut along some of the lines creating shapes mini milk carton to begin with and washed it with warm soapy water to remove any residue, allowing it to dry fully.

As my press is only small I cut down the big carton along the fold lines to create several small rectangles for individual plates and the smaller one I left whole, removing the round plastic spouts, so that the packaging pieces laid flat.
I then went back to my recent sketchbook explorations, for some shape and line inspiration and began drawing into the internal foil surface for the cartons with an old small metal barbecue skewer. This made impressions in the foil. I used a small craft knife to cut out shapes and carefully lift the foil layer to reveal the cardboard underneath.
| Preparing The Printing Plate

| Preparing The Paper
Dampened paper is recommended for this printing process so I popped a couple of sheets of bamboo paper into a basin of water whilst I did the next step.
I laid the plate on the bed of the press and drew around it so I had a reference shape as a guide as to where I should replace it once I'd finished inking it up. The registration paper was A4 - the same size as my bamboo paper, and once the two A4 sheets were lined up I could be sure that the plate and the print would be centered and straight (ish!).
| Testing the Roller Pressure
At this stage I also did a 'dry run' with the plate in situ and a piece of the bamboo paper to check I had the roller pressure about right - firm enough so that I got a slight indentation around the edges of the plate. This was a good way to get into the ball park of the right pressure to ensure a reasonable print outcome.
Testing the roller pressure with different paper thicknesses and the actual plate that will be printed is an important part of the process, particularly when using these cardboard plates, as the don't last in the same way a metal plate would, I can maybe get 5 or 6 prints from each before they start to become too flattened after several runs through the press.

| Inking the Plate
Unlike collagraph, there's no need to seal the cardboard plate, so the next step was to apply the ink. A tatty old student brush was just the job to work the ink into the surface of the plate. I used black Akua Intaglio ink. Tarlatan cloth is recommended for wiping the excess ink from the plate, but I didn't have any so just used a piece of old t-shirt, which seemed to work ok. I did wear gloves for this part of the process, as it's a bit messy.......I had a piece of newsprint down underneath the plate to I could work the ink into the edges of the plate without covering the bench in ink!

The areas where I had removed the foil layer really drank the ink but already could see where the dark areas of print would be. I did get the hang, as the session progressed, of lightly burnishing the foil areas with fabric, to remove more of the ink, which produced lighter toned areas in the final print.
| Making the Print
I placed the inked plate over my registration shape on the bed of the press, removed my inky gloves and retrieved the paper from the basin of water, blotting it dry between two old tea towels. The paper was damp to the touch but without any water sitting on the surface of it.
I carefully laid the dampened paper over the plate, making sure to line up all the edges of the A4 papers, placed the blanket over the paper/plate sandwich and cranked the handle to move the plate through the rollers.
I created three different plates for this printing session, using my 'Exploration Time' sketches for reference and made three prints of each. The prints all have interesting variations making them unique in their own way. I can definitely see some further potential for developing colour based abstract studies from these prints, and maybe even as surface designs for ceramics.....but that's for another day!

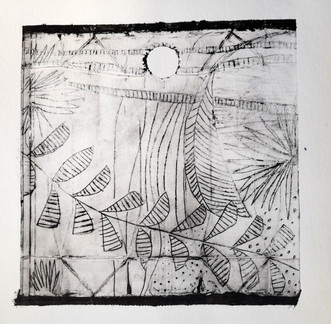
| Intaglio Tetrapak Printing Plate 1


| Intaglio Tetrapak Printing Plate 2


| Intaglio Tetrapak Printing Plate 3


| Join My Art Community
Subscribe to receive studio updates and be the first to hear about new original artworks and Limited Edition Print releases.
Enjoy $10 off your first Limited Edition Print, along with invitations to exhibition openings and early previews of new collections.
My Studio Diary newsletter offers you a glimpse inside my working studio; sharing the stories behind my paintings, insights into my creative process, techniques, materials, and the ideas that shape each body of work.
You’ll also receive blog articles, painting videos and studio vlogs that explore the thinking and inspiration behind my art.
Stay connected, discover new work first, and become part of my creative community!
#contemporaryabstractart #charlottewensleyart #abstractart #artvideo #artprocessvideo #abstractartprocess #australianart #contemporaryart #modernabstractart #modernart #charlottewensley #artblog #abstractartblog #artblogs #gelliprinting #gelliprint #artmakingvideo #artvideo #artmaking #newabstractart #abstractpaintings #gelliprintcollage #abstractartist #abstractartblog #mixedmediaart #mixedmedia #mixedmediaabstract #abstractmixedmedia #mixedmediaartist #mixedmediavideo #collageart #collage #modernabstracts #sketching #australianartist #artforinteriors #artistsvlog #abstractpainting #colouranddesign #originalabstractart #buyoriginalart #buyabstractart #artinnoosa #queenslandartists #noosaartist #australianartists #australianart #brisbaneartist #brisbaneart #melbourneart #artgalleries #artprints #surfacedesign #productdesign #homedecor #wallart #framedartprints #artprintoncanvas


